

How To Repair A Sprinkler Head
How to Ready a Sprinkler Arrangement
Exercise-it-yourself solutions to irritating irrigation problems.
![]() Fourth dimension
Fourth dimension
An hour or less
![]() Complexity
Complexity
Beginner
![]() Cost
Cost
Less than $twenty
Introduction
These uncomplicated lawn irrigation system fixes will solve xc percent of the common breakdowns. You'll save on repair bills and keep your lawn lush and green. No special skills needed.
Tools Required
Materials Required
- Band clamps
- Replacement heads and other parts
- Tubing repair parts
- Waterproof wire connectors
Project pace-past-footstep (11)
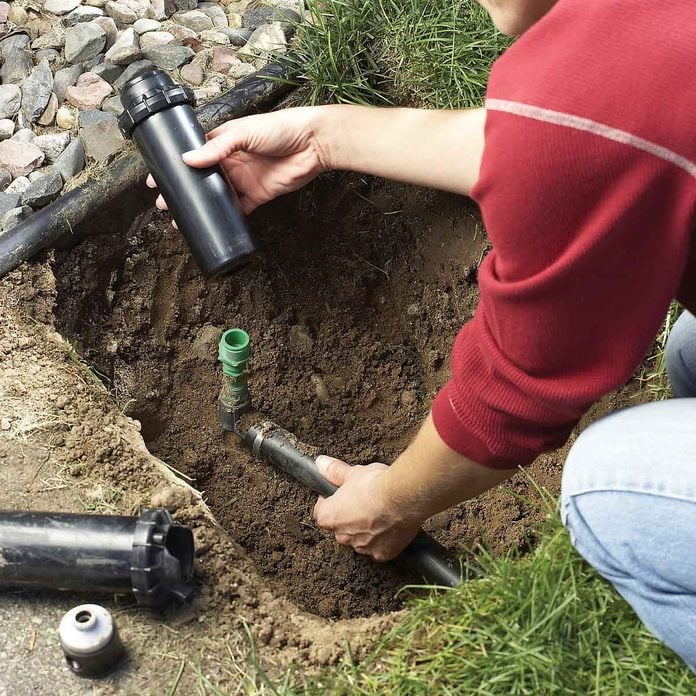
Step ane
Supercede a Sprinkler Head
- Dig around the sprinkler head to betrayal the riser.
- Unscrew the broken sprinkler caput from the riser.
- Install the new head, turning it tight with your hands.
Caution: Before you lot commencement digging to access the underground h2o lines, electrical wires or spray heads, punch 811 to have your undercover utility lines identified and marked.
Step 2
Make clean and Reset Heads
- Disassemble the sprinkler head by unscrewing the top from the canister.
- Rinse away soil and debris in a bucket of water.
- Remove the screen basket from the lesser of the head, and then clean it with water.
- Conform the watering range of the sprinkler head before installing information technology. Make final adjustments with the water running.

![]()
Step iii
Check the Valves
- If you're experiencing depression water pressure, bank check the sprinkler arrangement valves on the backflow device to brand sure they're open up.
- Plough the valve on the horizontal pipe first, then the vertical pipage valve.

Step four
Find and Repair Leaks
- Before making the repair, make sure the system is turned off at the controller.
- Cut out the damaged section of line.
- Identify a clench on 1 of the line ends, insert a slip coupling, then tighten the clench.
- Place a clench on the 2d pipage finish, expand the coupling while inserting the nipple into the pipe, and then tighten the clamp.

Step five
Repair Crushed Pipes
- Dig forth the water line until you find the damaged section. If the line runs near a tree, commencement your digging there.
- Once yous locate the damaged department, cutting it out with a hacksaw.
- If the line was damaged by tree roots, reroute the line past excavation a new trench away from the tree.
- Cutting a new department of pipage to supervene upon the damaged one.
- So replace the section of pipage, connecting it at each end with regular couplings and ring clamps.

Step six
Check for Depression Voltage
- Your watering system is divided into a series of zones.
- Generally, if you accept a zone that'southward non turning on, you have an electrical problem.
- Make sure the zone wires are firmly attached to the terminals in the controller, the transformer is plugged in, and the circuit breaker at the main console is on.
- Adjacent, exam for voltage to the nonworking zone, using a multimeter.
- Plough on the nonworking zone at the controller.
- Turn the multimeter punch to voltage and place ane lead on the common terminal.
- The common terminal will be marked "c" or "com"
- Place the other lead on the final of the zone that's not working.
- Refer to your possessor'due south transmission to see whether the voltage reading falls inside the required range (normally 24 to 28 volts).
- If it doesn't, the controller needs to be replaced.
- Refer to your possessor'due south transmission to see whether the voltage reading falls inside the required range (normally 24 to 28 volts).

Footstep 7
Exam the Transformer
- Test the transformer voltage by placing the multimeter leads on the transformer terminals marked "24 vac" with the transformer plugged in.
- If the reading is less than 22, replace the transformer.

Step 8
Replace Sprinkler Solenoid
- Disconnect the wires and unscrew the defective solenoid from the control valve. Insert a new one and plough information technology until it's finger-tight.

Step ix
Reconnect the Wires
- Connect the two wires on the new solenoid to the mutual wire and a field wire, using waterproof connectors.

Step 10
Waterproof Connectors
- Special connectors are filled with silicone to make the connections waterproof.
- If the controller, fuse and transformer check out OK, test the resistance "ohms" betwixt the common final and the nonworking zone.
- Turn off the system, plow the multimeter to examination for ohms (the omega symbol), and identify the leads on the common last and zone terminal, just as you lot did to exam for voltage.
- Compare the ohms reading with the range listed in your owner'south manual (commonly xx to 60 ohms).
- If the ohms autumn below the required corporeality, the switch (solenoid) that operates the control valve for that zone is lacking and needs to be replaced. The defective solenoid will be continued to the aforementioned color wire as the zone wire at the controller.

Footstep xi
Repair damaged wires
- If the ohms reading betwixt the common terminal and nonworking zone concluding is too high, the problem is a severed or bad wire to the control valve.
- If only one zone isn't working, the field wire is damaged.
- If none of the zones in a command valve box is working, the common wire is damaged, although the field wires could also be bad.
- To find a bad wire, bypass each in plow by temporarily substituting a 14-gauge wire for the original that you run above basis.
- Make the wire connections with the controller turned off. And so turn the controller back on.
- Test the field wire first.
- If the zone turns on, the old field wire is bad. Supercede information technology with an 18-approximate wire rated for hush-hush burying. Coffin the wire at least eight inches underground.
- Follow the same procedure to examination the common wire.
Originally Published: May 17, 2022
Source: https://www.familyhandyman.com/project/fixing-sprinkler-systems/
0 Response to "How To Repair A Sprinkler Head"
Post a Comment